Sample Preparation
Homogenization
Heating and Mixing
Electrophoresis and Blotting
Polyacrylamide Gel Electrophoresis
Agarose Gel Electrophoresis
Western Blotting
Power Supplies
PCR & qPCR Thermal Cycler
Thermal Cycler (PCR)
Real-time Thermal Cycler (qPCR)
PCR Workstations & Cabinets
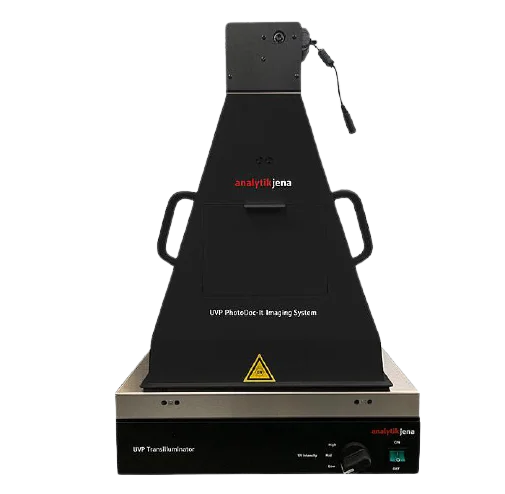
UVP BioImaging Systems
Molecular Spectroscopy
Lab Equipment
Ultraviolet Products
Hybridization Ovens
UVP Incubator
UV Crosslinkers
UVP Benchtop Transilluminators
Thermal Mixers
Electrophoresis & Blotting
Thermostats
View All
Fume hood
Laminar Airflow
Biosafety Cabinet
Autoclave
Centrifuge
pH Meter
Shaker & Mixer
Orbital Shaking Incubator
BOD Incubator
Heating Oven
Water Purification System
Aermax - Air Purification
Medical Oxygen Concetrators
Hygiene Solution
-150°C Cryogenic Freezer
-86°C Ultra Low Temp Freezer
-40°C Low Temp Freezer
-18 ~ -25°C Biomedical Freezer
-20°C Biomedical Freezer
4° ± 1°C Blood Bank Refrigerators
2~8°C Pharma Refrigerators
2~8°C ICE Lined Refrigerators
-25°C ~ + 4°C Mobile Freezer/Collers
20~24°C Blood Platelet Incubators
Ice Machines
Coldrooms
Mortuary Chambers
Aim
To provide a protocol for the proper use of the gel documentation system.
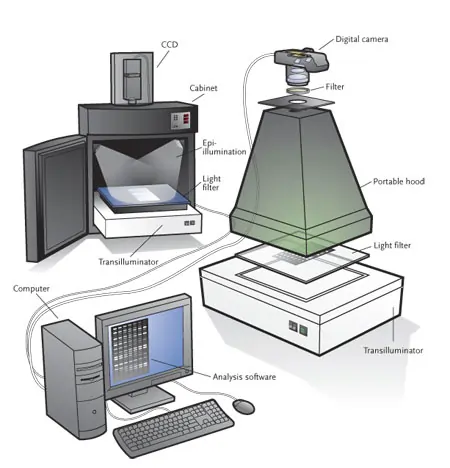
Starting the Program
In the gel imager, Mouse should be clicked by the ungloved hand to make the monitor active.
Setting the Gel inside the Chamber
In the gel imaging system, gel doc Imager software should be opened.
With the ungloved hand, the chamber door is opened and the gel obtained from agarose gel electrophoresis is loaded into the chamber. The gel should be kept in the center both vertically and horizontally for better visualization in the monitor and the background should be dark.
The door is closed fully and the UV light is switched on.
The position of the gel is checked well to get a better view of the screen. If the gel is crooked or not placed well, the light is switched off and the door is opened. The gel is placed in a better position, the door is closed and the light is switched on.
Once we are sure about the optimized position of the gel by viewing it on the screen, it is necessary to capture the image immediately as time proceeds, the quality of the gel decreases gradually. The reason is UV light is able to destroy protein and nucleic acid soon.
Before imaging, the gel type like protein blot or nucleic acid should be selected. White illumination plates should be used in the blot pictures. The type of filter and transilluminator also should be chosen.
Focus, aperture and zoom are being adjusted by an ungloved hand in the camera to get an optimized image.
‘Capture’ is clicked and ‘edit’ is clicked to adjust the brightness or contrast in the image.
There are two ways available for saving images. The image is frozen first and saved in a folder. This is one way. Another way of saving images is to save them directly. In case of any dissatisfaction in the image, unfreeze it and the live image is looked at again using the live option.
The image is saved in JPEG format.
Printing the Documentation
‘File’ is selected and option ‘print’ is chosen for printing the image
Closure of the Program
UV light is turned off.The Gel is removed from the chamber using the gloved hand and the surface is wiped with a tissue.The chamber is closed with the ungloved hand.In the logbook, the name and number of photos taken are written.The glass part of the device is cleaned by tissue soaked in alcohol after the work is over.
Precautions
Notes
Contingency Strategies
Skin contact
In any case ethidium bromide solution coming in contact with the skin, the exposed area should be washed thoroughly using soap and water.
Spills
The area should be secluded where the spill occurred. If required, assistance should be asked from the neighbour.
Ensure you are wearing a lab coat, closed toed shoes, gloves, and eye protection.
If the spill has occurred on benchkote, benchkote should be removed immediately and placed in a leak-proof container and the same should be labelled as ethidium bromide waste and disposed of properly.
If the gel was dropped on a hard surface, absorbent pads and paper towels should be used to wipe it off.
Sodium nitrite (4.2 g) and hypophosphorous acid (20 mL) are added to water (300 mL) and the solution is used for decontamination of the area. Paper towel soaked with the above solution can be used for washing the area. The area should be rinsed with the water repeatedly.
Conclusion
In order to obtain the best results, the gel imager should be handled accurately and properly by reading the guide manual of the instrument. The area, where the instrument is placed, should be neat and properly cleaned without any visible contamination. Furthermore, safety is the priority for the operator. Proper disposal is the key to the safety of the laboratory.